| 29 February 2004 |
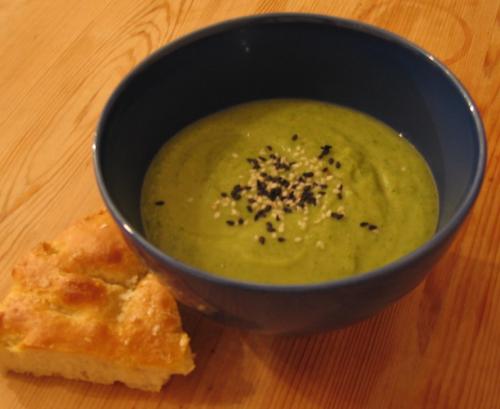 I meant to do lots of fantastic cooking over the weekend, but in the end we lazed around on Saturday and might not have made it to the grocery store on Sunday either, had we not run out of every single type of possible breakfast food. No milk, cereal, toast, eggs, baked beans or yoghurt anywhere in the house. Fortunately there was a bowl of blood oranges to see us through, but something still had to be done. So we did get to Waitrose, and picked up the ingredients for the zucchini and sesame soup I've adapted from one on Clotilde's webpage, and the wine to go in the focaccia (and to drink of course).
The soup is a delicate green, but has quite a hearty taste thanks to the tahini. The original recipe called for two heaped tablespoons of tahini, but I added just one and a half and might try even a little less next time. The chilli powder should be the tiniest pinch, not enough to make itself known as anything but a subliminal warmth.
Zucchini and sesame soup
| olive oil |
| 1 onion, peeled and chopped |
| 2 cloves of garlic, peeled and chopped |
| 1 kg zucchini (courgettes), chopped |
| 1 large potato, peeled and chopped |
| 2 cups vegetable stock |
| 1 tablespoon of tahini (or more to taste) |
| sea salt and black pepper |
| a pinch of chilli poweder |
| 1 tablespoon white and black sesame seeds, lightly toasted |
Heat a little olive oil in a large saucepan, then add the onion and saute over a medium heat for 8 minutes, until it is translucent and soft. Add the garlic and cook for another 2 minutes, then add the zucchini, potato and stock. Bring to a boil, then lower the heat, cover and simmer for about 20 minutes, or until the vegetables are cooked.
Remove about a cup of the cooking liquid from the saucepan and reserve. Put the rest of the soup in a food processor and blend to a puree. Return it to the saucepan, and add back all, some or none of the reserved cooking liquid, according to how thick you like your soup. Stir through the tahini paste, season with salt, pepper and a little chilli powder, and return to a simmer. Taste, adjust seasoning if necessary, then serve in bowls with a few sesame seeds sprinkled on top.
Serves 4.
| Go to the Soup archive |
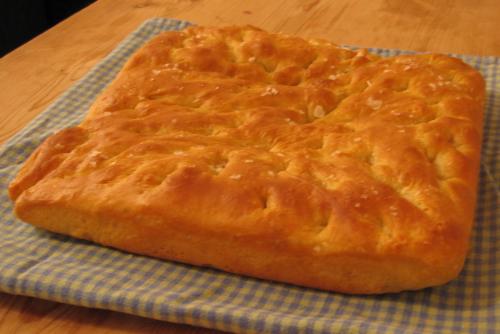
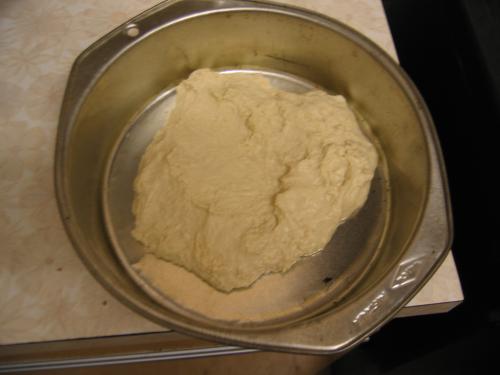
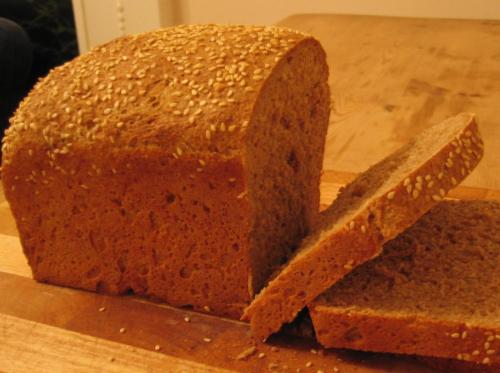
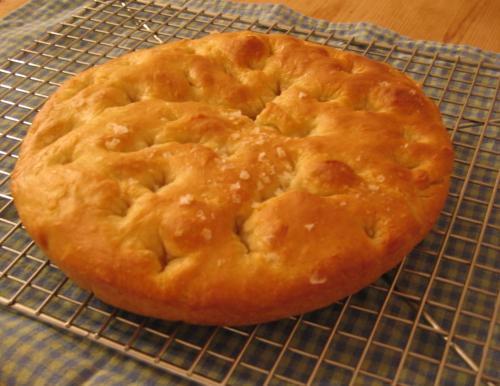 I recently bough Carol Field's The Italian Baker, and have been all excited to try it out, as a book from a new and much recommended author. Then I realised this afternoon, when I was looking through my cookbooks for a bread to have with the soup, that I already had one of her books, Focaccia. I've never made anything from it, so today I tried the Focaccia al'olio, flavoured with olive oil and white wine.
I made a few changes to the recipe, though nothing which should radically affect the taste. I mixed the sponge together at once, rather than letting the yeast start in the water only, since it was easy-start yeast. The original recipe also called for the inside of the oven to be sprayed with water from a spray-bottle several times during the first 10 minutes of cooking; since I can't remember the last time I owned a spray-bottle, I used a pan of water in the bottom of the oven instead. I also didn't have a 10 x 15 inch pan, so I used a 9 inch square pan and an 8 inch diameter cake tin instead.
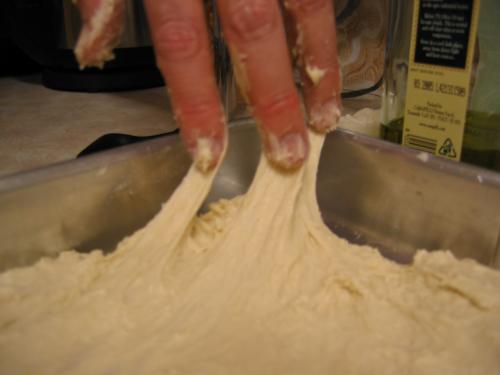
This dough was far wetter and stickier than most bread doughs I've made before, and I felt very happy to turn the kneading over the KitchenAid. Initially I couldn't believe that the dough was going to spread to fill the two pans after the first rise: it stuck more to my fingers than the pan, and refused to spread more than halfway. I left it alone to relax for about 10 minutes and came back to find that it was now behaving perfectly, and spread happily and without finger-stickage, right to the edges of the pan.
The focaccia turned out to be excellent, worth the slight hassle, with a delicate taste and a very light texture.
Focaccia from Genoa
Sponge
| 7g active dry yeast |
| 140 g (1 cup) unbleached plain flour |
| 2/3 cup warm water |
Dough
| 1/2 water, room temperature |
| 1/3 cup dry white wine |
| 1/3 cup extra virgin olive oil |
| 2 1/2 cups unbleached plain flour |
| 2 teaspoons sea salt |
Topping
| about 2 tablespoons extra virgin olive oil |
| 1/4 to 1 teaspoon sea salt (Maldon is good) |
To make the sponge, mix together the yeast and the flour in a large mixing bowl, then add the water and beat all together until smooth. Cover tightly, and leave to rise until puffy and bubbling, about 30 minutes.
To make the dough by hand: Add the water, wine and olive oil to the sponge. Whisk in 1 cup of flour and the salt, then beat in the rest of the flour until the dough is very soft and very sticky. Knead on a lightly floured board with 1 or 2 extra tablespoons of flour for 6 to 8 minutes, or until the dough comes together nicely and is silky and shiny. It should remain soft but not wet.
Alternatively, to make the dough in a KitchenAid: Make the sponge in the bowl of the mixer. Attach the paddle and add the water, wine and olive oil to the sponge. Add the flour and salt and mix until the dough comes together while remaining very soft. Change to the dough hook and knead for 3 minutes at medium speed, stopping once or twice to press the dough into a ball to aid in the kneading.
First rise: Place the dough in a lightly oiled container, cover tightly, and let rise until doubled, about 1 hour.
Second rise: The dough should now be soft, full of air bubbles, and stretch easily. Press it into a lightly oiled 10 x 15 inch pan (or two smaller pans). If it won't stretch across the pan, leave it for 10 minutes, then try again once it has relaxed. Dimple the dough with your fingertips, cover with a tea towel, and leave to rise until puffy and doubled, about 45 minutes.
Baking: Preheat the oven to 220 C about 30 minutes before beginning baking. Take the risen dough and dimple it again with your fingertips, then drizzle with olive oil and sprinkle with sea salt. Place the focaccia pan in the oven, and immediately reduce the temperature to 200 C. At the same time, place a pan full of water in the bottom of the oven, to provide light steam. Remove the pan of water after 10 minutes baking. Bake the focaccia for 25 to 30 minutes in total, until it is golden. Immediately remove from the pan and let cool on a rack. If you prefer a slightly crisper base, you can return the focaccia to the oven for another few minutes before cooling, placing the bread directly on the oven rack.
Serves 10.
| Go to the Bread archive |
| 24 February 2004 |
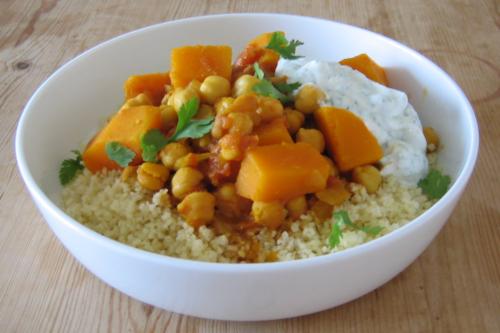 This recipe for a warm, spiced stew is slightly adapted from one on Sasha's food blog, A girl's gotta eat. It's easy to make and very satisfying in cool weather. It even looks quite sexy in the bowl - although I think it tastes best when the couscous and stew and yoghurt are all smooshed up together, at which point it's no longer quite as visually attractive.
Use fresh tomatoes here if you can get ripe ones. They're easy to peel, just cut a shallow cross in the bottom of each tomato, place in a bowl, cover with boiling water, drain after 1 minute, and the skin will peel right off. However, if it's the middle of winter and you can't find good fresh tomatoes, don't use tasteless unripe ones, just substitute well-drained tinned tomatoes instead.
Pumpkin and chick pea stew
| 1 onion, peeled and chopped |
| 2 tablespoons olive oil |
| 1 short cinnamon stick |
| 1 tablespoon ground cumin |
| 1 tablespoon ground ginger |
| 1 tablespoon paprika |
| 1/4 teaspoon cayenne pepper |
| 1/2 teaspoon turmeric |
| 4 peeled, chopped tomatoes |
| 2 cups cooked chickpeas (well rinsed, if using canned) |
| 3 cups butternut squash, cut into 2 cm cubes (about 450 g flesh) |
| 3 cups vegetable stock |
| 175 g couscous |
| 250 ml boiling water |
| 1 bunch coriander |
| 200 g greek yoghurt |
Heat the olive oil in a large pot, add the onions and the cinnamon stick, and cook over low to medium heat for about 10 minutes, until the onion is golden and soft.
Add the cumin, ginger, paprika, cayenne and turmeric and cook for 1 minute until aromatic, then add the tomatoes and cook for a couple of minutes until softened.
Add the chickpeas, pumpkin and stock, and bring to the boil. Reduce the heat and simmer, uncovered, for about 15 minutes or until the pumpkin is tender.
While the stew is simmering, put the couscous in a large bowl and pour over the boiling water. Leave to sit for 10 minutes until all the liquid is absorbed and the grains are tender. Fluff the couscous with a fork to break up any lumps.
Divide the bunch of coriander in half. Chop one half very finely, and mix into the yoghurt. Pull the leaves from the other half and tear up roughly.
Once the stew is ready, serve over the couscous, with a big spoonful of the coriander yoghurt, scattered with more of the coriander leaves.
Serves 4.
| Go to the Other savoury dishes archive |
| 21 February 2004 |
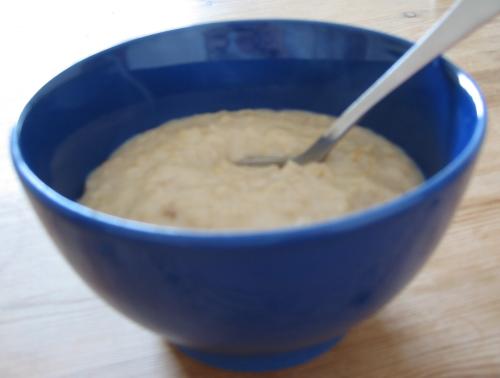 When I was little I was a slack lay-a-bed, especially on school mornings, so most of the time I ate cold cereal or toast for breakfast, since they're about the quickest meals possible. On weekends, and occassional organised weekday mornings, mum would sometimes make special breakfast foods - pikelets, corn fritters, or most commonly porridge. She made (and makes) porridge like her mother, my Nana, made it - sweet and heavy with milk, sharpened with a good pinch of salt.
Whenever we stayed at Nana and Grandad's overnight, there was always porridge in the morning, served in the special porridge bowls, which were wide and shallow, one with a green, intricate print on it (I think), and the other... I can't remember, a village market scene perhaps? But the bowls were an essential part of the experience. Nana would stir the porridge over the gas stove, and even now, over a decade since I last had porridge she made, it still only tastes right when there's that slight smell and warmth of a gas stove in the background.
I'm not sure if the recipe below is really the same as the porridge she made. I've always made it by eye and by taste, though I know that she measured out her oats and sugar using one of the enormous silvery-coppery 'tablespoons' she used and my mother still uses for cooking, which hold almost twice as much as a normal tablespoon. The amounts below make one very generous serving - enough to keep you going from an early breakfast till a late lunch without the slightest stomach rumbling. At Nana's this was always made with full-cream milk, from a glass bottle with a gold foil top, but I rarely have anything but semi-skimmed in the house and it works fine. The butter adds more creaminess but also a subtle flavour which I can't describe but which I miss when it's not there.
Nana's porridge
| 1/2 cup traditional rolled oats |
| a pinch of salt |
| 1 heaped dessertspoon of sugar |
| 1 cup milk |
| a knob of butter (optional) |
Put all the ingredients together in a saucepan. Bring to a simmer over medium heat, stirring frequently to prevent sticking. As soon as you see the first evidence of simmering, turn the heat down to low. Continue to cook, stirring, until the porridge has thickened a bit and the oats are softened - about 4-5 minutes. Eat at once.
| Go to the Breakfast archive |
| 19 February 2004 |
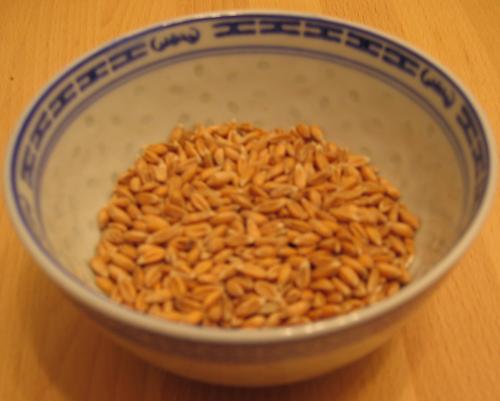
 In August 2001, Australian Gourmet Traveller included an article about rustic cakes - cakes made on buckwheat flour, polenta, almond meal and so on, all un-iced, mostly from traditional Italian recipes. The recipe which really struck me at the time, and which remained in my memory since then, was a chestnut flour, rosemary and pine nut cake. I had never tasted chestnuts at that time, but the cake sounded delicious and unusual. Ever since, I've kept an eye out for chestnut flour every time I found a new deli or foodstore. No luck until a month ago, when I went in to Infinity Foods in the right frame of mind and came out with not only the newly-discovered chestnut flour but also millet, spelt berries, spelt flour, barley flour, cracked buckwheat, interesting seedy things to add to bread, Japanese spices, organic dark chocolate with cherries and various other heavy things which had me cursing them by the time I'd carried them halfway home.
The chestnut flour then sat in the fridge for a few weeks while I was sick and busy and Ted was away and I couldn't be bothered to cook and so on and on, until yesterday when I finally felt like a cooking challenge again. I hadn't had a good look at the recipe in AGT since buying the flour, so wasn't entirely sure what I'd need to get at the store on the way home. So I did a web search for chestnut, rosemary and pine nut cakes before leaving uni, and found any number of recipes, all quite varied - some included sugar, others didn't, one suggested soaking the sultanas in verjuice, another in vin santo, others didn't specify but did include both walnuts and orange zest as additional flavourings. There was also variation in whether the sultanas, pine nuts and rosemary were stirred through the batter or scattered on top, on the relative proportions of chestnut flour and and water, and on the cooking time. But this didn't particularly bother me - I knew I was going home to the AGT recipe, so I'd just pick up all the possible additions, and use whichever ones were called for there.
You see where this is going, right? I stopped at Waitrose and picked up rosemary, pine nuts, walnuts and an orange. Then when I got home, I opened up the magazine and found that it was, as they called it, an adaptation of the original recipe - half chestnut flour and half self-raising wheat flour, lots of sugar, plus bicarbonate of soda, butter and an egg. I read this and with all the authority of an hour's web research exclaimed "a real castagnaccio would never include these ingredients!", and decided to cook a cake based on the other recipes I'd looked at. This was where all those inconsistencies I mentioned above reared their ugly heads. I wanted to be reasonably sure that what I produced would be edible, but none of the individual recipes contained all the elements I wanted - I knew I definitely wanted to add the orange zest and a little sugar, didn't want walnuts, and would rather that the raisins were stirred through the batter but some at least of the pine nuts and rosemary were on top.
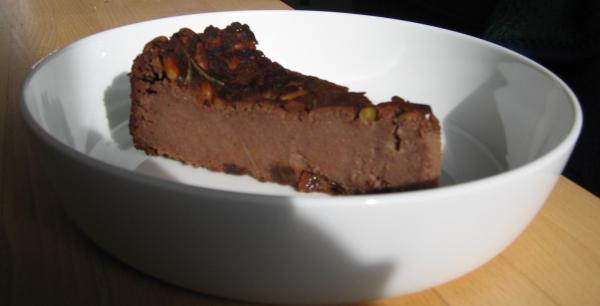
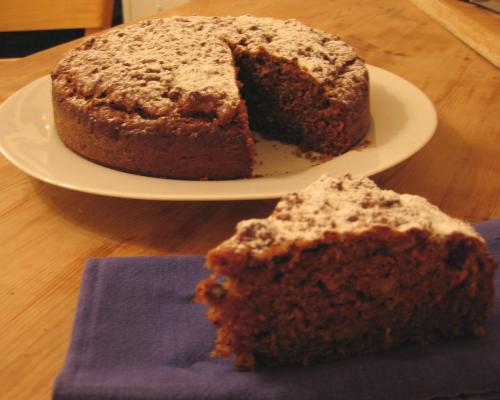
So I worked out the most commonly-used ratio of chestnut flour to water (and most of the other recipes didn't deviate from it that much), then estimated the volumes of the remaining ingredients which would be appropriate, and began. I got halfway through the early step of adding the water, then stopped and went to throroughly recheck the recipes. Yes, it really was that much water, and yes, one recipe did reassuringly say that the batter would be "fluid". So I continuted and ended up with a very thin, brown batter, into which I stirred the oil, zest, sultanas and rosemary. I could see that the sultanas dropped straight to the bottom of the mixture, and realised that it was going to be dificult scattering anything over the top of this batter and expecting it to stay there, so stirred the pine nuts through too. I decanted it into the tin, strewed a few whole rosemary leaves over the top, and put it in the oven to bake. After the 70 minutes cooking the top was nice and brown and cracked, but since I'd fooled around with measurements and cake tin sizes and cooking times and so on I wanted to be sure it was done, and so stuck a knife into the centre. It came out caked with mush. I left the cake to cook for a further 10 minutes. Still mush. Another 20 (by which time, in my heart, I had completely given up on eating the cake - it was now a chemistry experiment): still mush. I was sick of checking on it so took it out of the oven and left it alone, cross and bothered that it hadn't worked.
The next morning, in a rather happier frame of mind, I cut a slice of the cake to try. And you know, I think if I had taken it out of the oven at the right time, it would have been pretty damn nice. The edges of the cake were chewy and overcooked, and the top was too dark and a little dry, but most of it was delicious. I had been deceived by the idea that it was a chestnut "cake", and by the picture of the adapted recipe in AGT. What I had wasn't a cake, except in the sense that it was made on a kind of flour and baked in a cake tin. It was more like a firm chestnut paste, similar to a smooth baked cheesecake in texture, slighly sweet, with lovely hints of rosemary and orange flavours. The sultanas had sunk to the bottom and were discernable only as slighly squishy, chewy sweet bits on bottom crust, and the pine nuts had all floated to the top and were golden and toasty. I have no idea whether what I made was a genuine (if overcooked) castagnaccio, but I liked it (or what it had the potential to be) and would make it again, this time cooking it for just 70 minutes and keeping my fingers crossed that it would set when cold. If anyone knows anything at all about cooking castagnaccio, and has any advice or comments or corrections for me, please email me at and let me know!
Castagnaccio
| 1/3 cup sultanas |
| vin santo, other Italian dessert wine, or verjuice, to soak the sultanas |
| 500 g chestnut flour |
| 1/3 cup brown sugar |
| a pinch of salt |
| 1 litre cool water |
| 3 tablespoons olive oil |
| grated zest of 1 orange |
| 1/3 cup pine nuts |
| 1 large sprig of rosemary, leaves chopped |
| a few extra rosemary leaves, whole, to decorate |
Preaheat the oven to 230 C. Grease and line a 22cm (9 inch) diameter springform pan.
Put the sultanas into a small bowl, just cover with the wine or verjuice, and leave to soak and plump up for 20 minutes. Drain and set the sultanas aside.
Stir the chestnut flour into a large bowl, the add the sugar and salt and stir to mix. Add the water gradually, mixing well between additions to avoid lumps. The batter should end up fluid and completely smooth. Add the olive oil, orange zest, pine nuts, sultanas and chopped rosemary, and stir well.
Pour the batter into the prepared pan. Bake at 230 C for 10 minutes, then reduce the heat to 200 C and bake a further 60 minutes. Check on the cake after 30 minutes, and cover with alfoil or newspaper if the top is browning to quickly. Don't use the skewer test to check if the cake is done - the centre won't set until the cake is compeltely cool. After 70 minutes in the oven, the surface of the cake should be dark golden brown and covered with cracks like a dry lake bed. Remove the cake from the oven and cool in the tin for a couple of hours before removing. Serve at room temperature.
| Go to the Cakes archive |
| 12 February 2004 |
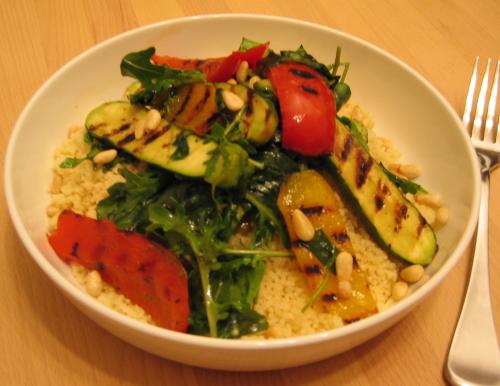 Snowdrops are out! There are purple and yellow crocuses (crocii?) under the trees at uni and the daffodils are clusters of green spikes ready to burst open soon. So I don't care if it's officially winter for another month, I'm ready for spring - and I'm so so so sick of root vegetables. Hence tonight's dinner, which takes advantage of the unnatural transport of vegetables across the globe, allowing me to eat baby zucchini, ripe capsicums and fresh basil when it's 8 degrees C outside if I'm lucky.
I was originally going to serve this with toasted millet, rather than couscous, but it didn't quite work out. We were following Rose Elliot's recipe for cooking millet, which promised that we would end up with dry and fluffy grains. Instead, we got sticky, wet porridge, not really what we were after, so couscous came to the rescue. Although, had we been less hungry, the grilled vegetables tossed with salad leaves and lime juice would have made a delicious dinner on their own.
Grilled peppers and baby courgettes with leaves, lime and couscous| 6 baby zucchinis (courgettes) |
| 1 red capsicum (pepper) |
| 1 yellow capsicum |
| garlic-infused olive oil (or normal will do) |
| sea salt and freshly ground black pepper |
| 175 g couscous |
| 250 ml water or very light vegetable stock |
| 80 g mixed leaves - watercress, rocket and baby spinach is a good mix |
| juice and zest of 1 lime |
| 1 tablespoon toasted pine nuts |
Slice the baby zucchinis in half lengthwise. Cut the capsicums into wide slices, each about 3 x 8 cm. Put the vegetables together in a bowl, drizzle over a little of the olive oil (you really only need a tiny bit) and toss with your hands until they are all covered with a fine layer of oil. Heat a ridged grill pan on the stove, then grill the vegetables, for 3-5 minutes on each side, until they are tender and branded with grill marks. Return them to the bowl, toss with a little sea salt and pepper, and let cool slightly.
Put the couscous in another bowl. Bring the water or stock to a boil, add to the couscous, stir through, and leave for about 10 minutes, until the liquid is all absorbed. Stir up the couscous with a fork, until all the lumps are broken up.
While the couscous is cooking, add the mixed leaves, lime zest and juice to the grilled vegetables, and toss well.
To serve, divide the couscous between two plates. Top with the vegetable mixture, and sprinkle with pine nuts. Eat while warm.
Serves 2 generously.
| Go to the Mediterranean archive |
| 8 February 2004 |
Is my blog burning?
 Alberto of Il Forno proposed an excellent idea - a day when many food bloggers take a certain theme and each come up with an appropriate recipe. Much as I love deciding what to have for dinner on the train home from uni each day, in response to how I'm feeling at the time, I also really respond happily to this kind of set challenge. I feel much the same way about Christmas cooking. I'm not interested in producing a kitchenful of my family's traditional Christmas food, and I am very glad that there's no obligations so if Ted and I feel like eating toast all three meals on Christmas day, we'll do so, but I still like the sense that there's a set of seasonal, traditional recipes which many people in the community are working on at the same time, each in their own way.
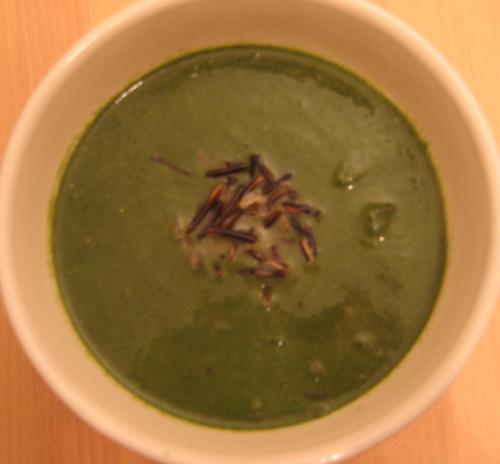
So the theme for this episode (I hope there are more to come!) of the "Is my blog burning?" challenge was soup. This fitted in well with my original plans for this week anyway - Ted is away, and so I was intending to indulge my love of lentil soup (not Ted's favourite food). By when it came down to it, I just wasn't, for once, in the mood for lentils. What I wanted was a big big bowl of something lovely and velvety and green. I also wanted to have a play with wild rice, an ingredient I have occasionally eaten in restaurants, but never cooked with myself. So, I thought, a soup of green vegetables, with wild rice.... and the flavourings? Buttermilk, lemon juice and dill, for a slightly sour contrast to the sweetness of the greens and the nuttiness of the rice. And I like the results a lot!
I should add that this is not a soup to make one day and then serve at a dinner party the next - the lovely dark minty-green colour changes overnight to a not so charming khaki! It still tastes good, though.
Soup of greens with wild rice| 125 g wild rice |
| olive oil |
| 2 onions, peeled and chopped |
| 3 cloves garlic, peeled and crushed |
| 4 cups water or light vegetable stock |
| 250 g swiss chard, stems removed, leaves chopped |
| 2 medium leeks, white and pale green parts only, chopped |
| 500 g young spinach, chopped |
| 1 small bunch (about 50 g) watercress, chopped |
| 1 bunch (about 80 g) flat-leaf parsley, chopped |
| half a small bunch (maybe 10 g?) fresh dill, chopped |
| juice of half a small lemon |
| 150 ml buttermilk |
| sea salt and finely ground black pepper |
Bring a large saucepan of lighly salted water to the boil. Add the wild rice and give it a stir to prevent it sticking to the bottom. Simmer for 45-50 minutes, until the grains have popped (so you can see a little of the white interior of the grain) and they are softened but still al dente. Drain and set aside. Reserve a little of the cooked rice to one side for garnish.
Heat a little olive oil in a large saucepan, then add the onions and saute over low heat for 10-15 minutes until they are golden and mellow-tasting. Add the garlic and cook another 2 minutes, then pour in the water or vegetable stock.
Add the chard, leeks, spinach, watercress and parsley to the pot. Unless you are using a gigantic saucepan, you'll probably have to add the leaves in two lots - just let them cook down then add the rest. Simmer for 20 minutes or so, until the chard and leeks are very tender. Add the dill and stir through.
Puree the soup in a food processor in batches, then return it to the cleaned pot. Add the cooked wild rice, and bring back to a simmer. Cook for about 5 minutes, until the rice and the liquid are warmed through. Stir in the lemon juice and buttermilk, and season to taste.
Ladle the soup into bowls, garnish with a little pinch of reserved wild rice in the centre of the bowl, and serve at once.
| Go to the Soup archive |
| 7 February 2004 |
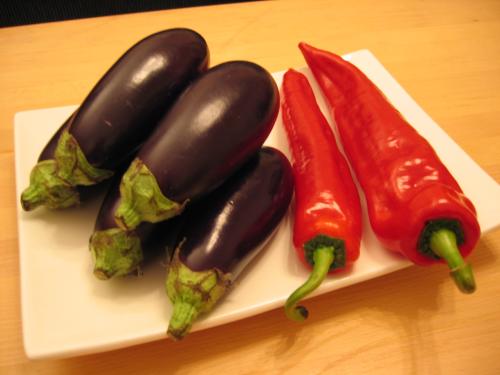
 In a continuation of the "let's not die of heart disease just yet" cooking plan, we made a Japanese-inspired dish tonight, a combination of vegetables and tofu in a quite light and subtle miso sauce. It uses two vegetables I rarely cook with, Japanese eggplants and banana chillies. The eggplants are those thin ones which look like shiny purple courgettes, although I'm sure you could use the normal Italian eggplants if you couldn't get the Japanese variety. The ones we used were about 15 cm long, very plump, and completely seedless, really ideal. The banana chillies don't have any chilli heat - they taste quite like capsicum, but are less crisp, so only need a couple of minutes cooking at the end. If you can't find them and have to substitute capsicum, add it a little earlier. The chilli or capsicum and the snow peas should stay quite firm though, to contrast with the beautifully tender eggplant.
Aubergine and tofu with miso sauce
| 2 heaped tablespoons white miso |
| 1 tablespoon soy sauce |
| 1 tablespoon sugar |
| 1/4 teaspoon salt |
| 250 ml water |
| 450 g Japanese eggplants (aubergines) |
| 1 thumb-sized piece of fresh ginger |
| 2 red banana chilies |
| 200 g smoked tofu |
| 3 tablespoons peanut oil |
| 1 tablespoon sesame oil |
| 100 g snow peas (mangetout) |
| 2 spring onions (scallions), dark and light green parts only |
| 2 teaspoons each of white sesame seeds and black sesame seeds |
| 300 g rice, boiled |
Mix together the white miso, soy sauce, sugar and salt in a bowl, then gradually stir in the water to make a thin sauce.
Top and tail the aubergines. Slice them in half lengthwise if they are thin, or into quarters if they're plump, then cut into pieces about 1.5 cm thick. Peel the ginger and chop very finely. Halve the banana chillies lengthwise, remove the seeds and membranes, and then slice into pieces about 7 mm wide. Chop the tofu into 1.5 cm cubes.
Heat the peanut and sesame oils together in a large wok. Add the aubergine and cook over medium-high heat for 7-10 minutes, until it is golden and softening. Add the ginger and cook for 1 minute, then tip in the miso and water mixture and stir well. Let it simmer for 5-7 minutes, until the aubergine is tender, then add the banana chillies, tofu and snow peas. Stir to combine everything in the sauce, then put a lid over the wok and let it cook for another 2-4 minutes, until the tofu is warmed through and the chillies and snow peas are just beginning to soften. Remove from the heat and stir through the chopped spring onions.
Serve the vegetables over the rice, drizzling any remaining sauce over the top. Scatter with the toasted sesame seeds, and eat at once.
Serves 4.
| Go to the Asian archive |
| 5 February 2004 |
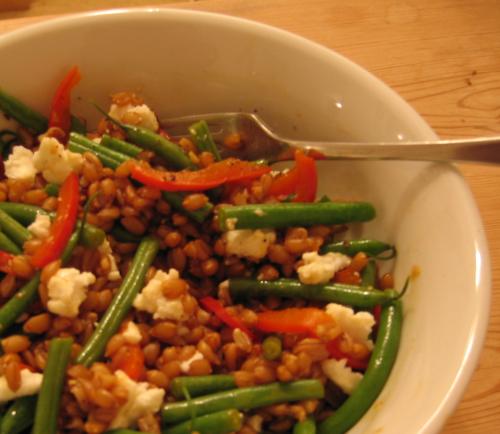 Despite my recent enthusiasm for making non-white bread (there's currently a spelt-bit of rye-wholemeal-seedy loaf sitting cooling in the kitchen), we've been eating pretty unhealthily for the last few weeks. Lots of sugar-poached quinces and their derivatives, blog-inspired oeuf cocotte with Boursin cheese and red onion confit, all-too-easily delivered La Cucina pizza, and then a gigantic meal at Tamarind in London last night..... I feel like a bloated jellyfish. Or some other disgusting thing. So tonight I wanted something whole-grainy, with fresh vegetables and not too much fat. I bought a packet of spelt last time I went overboard at Infinity Foods, so I put that on to cook and then rustled up some capsicum and beans left over from a couple of nights ago (I always feel so virtuous when I use up left over vegetables, rather than letting them go liquid in the crisper!). I was going to leave out the feta - I tasted the dish before adding it, and it was perfectly good as it was - but Ted seduced me over to the dark side by opening the packet to put some cheese on his share. And that little bit of creamy saltiness scattered through the nutty, chewy grains does work very well. I'd be very happy to make this recipe again, even when not specifically in search of gastronomic wholesomeness.
| 1.25 cups spelt (a.k.a. farro) |
| 2 cups light vegetable stock |
| sea salt and freshly ground black pepper |
| 1 small red capsicum |
| 150 g green beans |
| 2 cloves garlic |
| 15 ml sherry vinegar |
| a dash of olive or walnut oil |
| 100 g sheep's milk feta |
Rinse the spelt in a sieve and drain well. Put the spelt and the stock in a pot with a tight-fitting lid. Bring to the boil, then turn down the heat and simmer for about an hour, until the stock is absorbed and the spelt is tender but still firm to the bite. Towards the end of the hour, check on the spelt to make sure that it's not boiling dry, and add more liquid if necessary. If there's too much liquid, leave the lid off for the last 10 minutes or so to let it boil off. Season to taste.
When the farro is almost done, prepare the vegetables. Cut the capsicum into very fine strips. Top the beans, and cut in half. Peel and mince the garlic. Heat a little oil in a wok, then add the capsicum, beans, garlic and vinegar. Stir over medium heat for 4 or 5 minutes, until the vegetables are tender (if you prefer the beans to be less crispy, you can blanch them first).
Mix together the spelt, the vegetables and the crumbled feta, and serve at once.
Serves 2.
| Go to the Salads archive |
| 1 February 2004 |
 Even though the Grant loaf I made a couple of weeks ago wasn't a complete success, I was eager to try it again. I can't think of a quicker or easier bread than this - a quick mixing, no kneading, and just one short rise in the tin. And the taste, especially with spelt flour, was very pleasant, especially for sandwiches or toast. The two main problems last time were over-rising, and mismatch between the size of the dough and the size of the tin (even without the over-rising). This time I was less nervous about the brevity of the rising period (only 30 minutes if the room is warm), so when I saw that the bread was reaching the top of the tin I whipped it straight into the oven 31 minutes after starting the rise. I also used a combination of wholemeal and spelt flour, which rises slightly less rapidly than spelt flour alone.
The second problem was solved by using a different version of the recipe. Last time I used Linda Collister's recipe, which called for 700 g of flour and 600 ml of water, to go in a 900 g loaf tin. I looked at a few other versions of the Grant loaf, and all of them used less flour, less liquid, or both. I ended up using proportions similar to those in a Delia recipe - she may be boring but she's generally reliable. And indeed, this time the dough fit the tin perfectly, rising to just under the rim before I baked it, and just poking its head over the top to get nicely browned in the oven.
The Grant loaf| 570 g stoneground wholemeal or spelt flour |
| 1 heaped teaspoon salt |
| 2 level teaspoons easy-blend dried yeast |
| 1 heaped teaspoon brown sugar |
| 400 ml hand-hot water |
| 1 tablespoon sesame seeds |
Preheat the oven to 100C. Butter a 900 g loaf tin.
Warm the flour in the oven for about 5 minutes. Remove the flour, then turn the oven up to 200C.
Place the warmed flour, salt, yeast and sugar in a large mixing bowl and mix together thoroughly. Make a well in the centre and pour in the water. With a large spoon, mix the liquid into the flour to form a dough. Add a trickle more water if necessary (it's better to make it a bit too liquid than too dry - this is naturally a moist loaf). Work the dough, preferably with your hands though with a spoon will do, for about 1 minute, until the dough is smooth and comes cleanly away from the sides of the bowl.
Tip the dough into the prepared tin, and scatter with sesame seeds. Cover with a damp, clean teatowel and leave to rise until the dough reaches the top of the tin. With wholemeal flour, this should take about 30-40 minutes in a warm place, up to an hour at cool room temperature. Spelt flour rises a little quicker, so keep an eye on it.
Bake the bread for 35-40 minutes. Test that the bread is cooked by turning it out of its tin and knocking on the bottom - it should sound hollow. If it sounds dead, put it back into the oven for 5 minutes and then try again. Cool the bread on a wire rack before eating.
| Go to the Bread archive |
 So, for dinner we had potato and leek soup with Grant bread, and then for dessert..... well, I had six poached quinces I hadn't really planned on, and even my appetite for quince with cream, quince with yoghurt, quince by itself, etc etc, fades in the end. Fortunately, Stephanie Alexander's Cook's Companion had the solution: quince and nut cake. You can use walnuts, almonds, pecans, or a mixture in this recipe. I am not normally a big fan of walnuts, and love almonds, but in this case I do think that walnuts fit best. The cake is dark, moist, and not too sweet - a surprisingly traditional fruit cake, without a very strong taste of quince.
| 375 g plain flour |
| 2 teaspoons bicarbonate of soda |
| 2 heaped teaspoons ground cinnamon |
| 2 heaped teaspoons ground allspice |
| 1/2 teaspoon salt |
| 1 cup roughly crushed walnuts |
| 2 cups poached quince (from about 3 quinces), mashed |
| 1 cup brown sugar |
| 2 eggs |
| 250 g butter, melted and cooled completely |
| pure icing sugar |
Butter and flour a 23 cm springform pan. Preheat the oven to 180C.
Sift the flour, soda, cinnamon, allspice and salt together in a bowl. Stir in the nuts.
In a large bowl, stir together the quince and the sugar. Whisk the eggs into the cooled butter, then gently stir this into the quince mixture. Gently stir in the flour mixture and stir well.
Spoon into the prepared tin. Bake for 55-65 minutes, or until a knife inserted in the centre comes out clean. Cool the cake in the tin. Unmould and sprinkle with icing sugar before serving.
| Go to the Cakes archive |
| Recent additions |
| Go to recipe archive |
| Up next |
| Almond, saffron and sultana halva |
| Anise biscotti |
| Caramelised red onion jam |
| Muhommorah |
| Double happiness beans |
| Rustic rapini torta |
| Stuffed eggplants |
| Udon noodles in miso-sesame broth |
| Galettes |
| Current food reading |
| Search www.woolfit.com |
| Email me |